
Valerie's Adventure in Wedding Dress Restoration

When I first started looking for a dress, I had in mind an 1880s-influenced style. Not necessarily an authentic costume; maybe one of those contemporary gowns with the quasi-bustles and trains and décolletages with fabric roses. Something along these lines...
In a way, fashion caught up with the kind of dress I'd been picturing--and even sketched a time or two--since college.
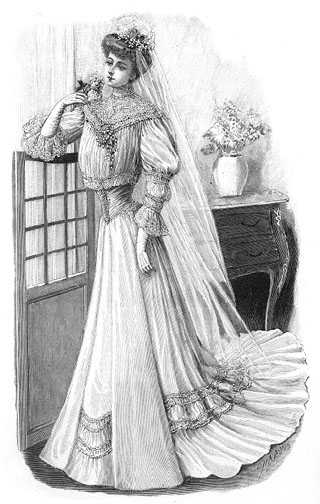 Not that it was the opposite...the turn-of-the-century "Gibson Girl" look is my second favorite after the 1880s, and this was a real find. It's a 1905 vintage skirt and short bodice in ivory china silk, with a lace yoke and ball-fringe trim, in excellent condition considering its age and fragility. Just a couple days later, I picked up a book of reprinted fashion plates from La Mode Illustrée at the Peanut Butter Warehouse antique mall in Galveston. It's an overview of bridal fashions from 1862-1912, and when I opened to 1905, what should I find but this illustration--remarkably similar to what I had just bought! So now I had a template to work from in restoring it.
Below are more "before" pictures of the dress:
 Closer view of front
 Collar
 Yoke (bobbin lace--may be machine-made)
So what does "restore and alter" actually mean? Well, first of all I'll be cleaning it with a special detergent (whose name escapes me at the moment) to hopefully remove some small spots of discoloration. Then I will replace damaged sections, and add an underlayer to the skirt, with an extra flounce (because the original owner of this dress was evidently quite a bit shorter than I am) and a train. The train will be modeled on the illustration above, and on a couple photos I've come across on the Web: Train 1
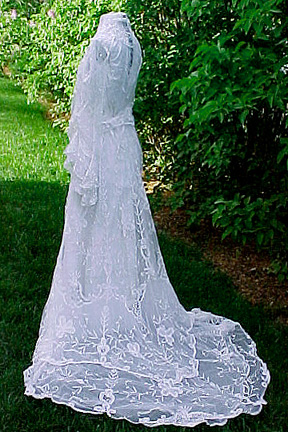 .
.I will also need to make a corselette-belt that goes over the waistband of the skirt and under the bottom edge of the bodice, as seen in the illustration. I'll probably make it from ivory satin; details to come! I'll probably also make the veil, which is likely to be long but simple, if for no other reason than because any other lace would clash with the unique lace on the bodice of the dress.
 The above photos of the dress are taken with it over the undergarments I'll be wearing that day. First to go on are the drawers, which I found on an eBay auction. They are pretty standard Victorian drawers, knee length with a drawstring waist and open crotch. If you're wondering about that last detail, you've never tried to use the ladies' room in all the layers I'm about to continue describing! ;-)
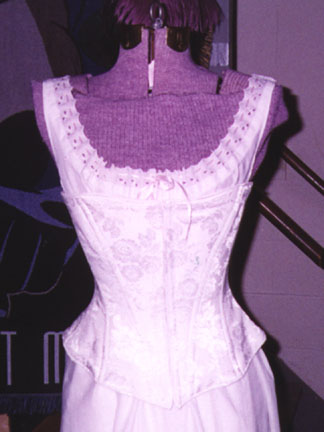 I definitely wasn't going to find a period specimen of the next piece (at least not one I wanted to wear): the corset. This is important to create the right period "silhouette", so that the dress looks right when I put it on. This was my first attempt at making a real corset, and it actually turned out pretty well (though there are things I'll do differently next time). I made it from white cotton brocade lined with cotton twill, with a layer of medium-weight interfacing sandwiched in between. I used poly boning because it's perfectly sufficient for me (this girl is so not a tightlacing aficionado, nor exceptionally endowed). The front edges are fastened with hook-and-eye tape because I didn't feel like special-ordering corset fasteners; again these are sufficient for the amount of stress I'm putting on them, but next time I'll probably order the proper hardware in the interest of authenticity. I also cut it just a trifle bigger than I should have; the back edges should be about 2 inches apart when it's laced properly, but mine meet. It works for this purpose, though. People cringe when I say the word "corset", but like I said I'm not a tightlacer--this one laces my waist to about 25 1/2" from my natural 27. It's for shape and support, not for trying to be Scarlett O'Hara. (Even if I do plan to get a pre-wedding photo of Mom lacing it with me hanging onto something! *giggle*) I gave this corset a trial run under a costume I wore at AmberCon in March, and surprised myself by being perfectly comfortable in it for about 6 hours--longer than I'll be wearing it for the wedding! Happy me. And very glad I happen to have a narrow rib cage, because that's what a corset squishes the worst on most people.
The last layer before the dress is the corset cover, which I forgot to take a picture of because it's actually part of my regular wardrobe and was upstairs in my summer clothes drawer! It's a semi-fitted, button-front cotton camisole that I bought about 1988, and is basically identical in structure to several period examples of corset covers that I've seen. Its main purpose is to protect the dress from the corset hardware...an important purpose when the dress is made of almost-sheer 94-year-old silk!